http://www.eclipse.org/articles/Article-Launch-Framework/launch.html
Launching is centered around two main entities,
LaunchConfigurations and
LaunchConfigurationTypes.
- LaunchConfigurationType/Config-type : is an entity that knows how to launch certain types of launch configurations.
- Launch configurations / configs : are entities that contain all information necessary to perform a specific launch.
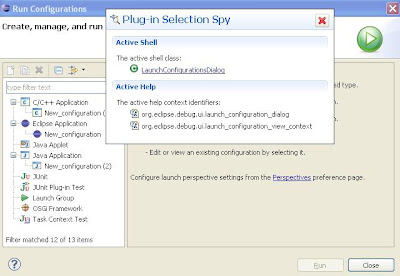
Once a config type is implemented , the launching infrastructure contributed by the Debug core plug-in (org.eclipse.debug.core) creates configs on behalf of the config type, and infrastructure provided by the Debug UI plug-in ( org.eclipse.debug.ui) provides a dialog to manage configs (the 'LaunchConfigurationDialog'), as well as other launching-related UI.
To use the launcher API, plug-in must make some import declarations in its plugin.xml file.
- If your plug-in declares a config type, it must import org.eclipse.debug.core, and
- if plug-in declares anything related to launching UI, must import org.eclipse.debug.ui.
- Note : In this case, the launcher can only be used programmatically from within code, not by a user (see the forthcoming related article "How to Launch Java Applications Programmatically" by Darin Wright).
****************************************************************************
Developing a launcher for Java applets. :
******************************************************************
- declaring a config type : as shown in the following snippet of XML from our plug-in's plugin.xml file.
Non-UI declaration
extension point<"org.eclipse.debug.core.launchConfigurationTypes">
launchConfigurationType
name="Diana's Java Applet"
modes="run, debug"
delegate= "org.eclipse.jdt.internal.launching.JavaAppletLaunchConfigurationDelegate"
id="org.eclipse.jdt.launching.dianasjavaApplet">
launchConfigurationType
extension>
- The most important part of this declaration is the delegate attribute which specifies the fully-qualified name of a class that implements the interface org.eclipse.debug.core.model.ILaunchConfigurationDelegate. The delegate is the brains of the launcher, and implements the launch() method which launches a specified config.
- The modes attribute specifies one or both of run & debug. Note :When specifying a launch mode in code, you should never use a hard-coded String. Instead, use one of the constants defined in org.eclipse.debug.core.ILaunchManager.
- if the launch configuration dialog is opened in run mode, but your config type is for debug mode only, then your config type and any associated configs will not appear.
- Note : if your config type declares both modes, it is your delegate's responsibility in the launch() method to handle both modes.
- An optional attribute not present in the above declaration is private. This is a boolean attribute that indicates whether the config type should appear in the UI, if there is one. Setting this attribute to true effectively makes your launcher usable for programmatic launching only. The default value, if this attribute is omitted, is false.
- Another optional attribute not shown above is category.
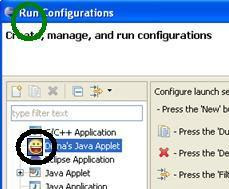
Result : Including the above snippet in plugin.xml as the first step will enable the type, "Diana's Java Applet" to be visible as one of the Config types in both,
Debug configurations.... & Run Configurations.... as in figure below

******************************************************************
2.
declaring a config type icon: For this, include the snippet below in Plugin.xml
UI declaration
extension point="org.eclipse.debug.ui.launchConfigurationTypeImages"
launchConfigurationTypeImage icon="icons/full/ctool16/java_applet.gif"
configTypeID="org.eclipse.jdt.launching.dianajavaApplet"
id="org.eclipse.jdt.debug.ui.launchConfigurationTypeImage.javaApplet"
launchConfigurationTypeImage
extension
- Note that the id attribute is just a unique identifier,
- whereas the configTypeID attribute should have the same value as the id attribute for our config type declaration.
Result:
*************************************************************
3. Declaring a tab group : LaunchConfigurationDialog(LCD) provided by the Debug UI plug-in is a central point for creating, managing, deleting and launching configs of any config type. The LCD is broken into two main regions:
The config tree shows all configs currently defined in the workspace, grouped by config type.
The tabbed folder(list of tabs collectively called as tab groups), lets users edit attributes of the config currently selected in the tree. The contents of this tabbed folder are specified when you declare a tab group. For this, include the snippet below in Plugin.xml :
extension point="org.eclipse.debug.ui.launchConfigurationTabGroups"
launchConfigurationTabGroup
type="org.eclipse.jdt.launching.dianajavaApplet"
class="org.eclipse.jdt.internal.debug.ui.launcher.JavaAppletTabGroup"
id="org.eclipse.jdt.debug.ui.launchConfigurationTabGroup.javaApplet"
launchConfigurationTabGroup
extension
******************************************************************
Now, in order to make a customised Launch configuration, that is... to make a customised launch item in the list of Launch types(Eclipse Application, SWT application, Java Application, Java Applet, etc),
All the above steps would include copy of the JavaApplet Launch item in the Run/Debug configurations.... However, since the delegate included for the ConfigurationType in the extension point is specific for JavaApplet,which is -->"delegate = "org.eclipse.jdt.internal.launching.ui.JavaAppletLaunchConfigurationDelegate""..
This would open the TabGroup specific to JavaApplet Launch. And hence, everytime double-clicked, a Configuration item is added not under your type, but under JavaApplet type. or. the set of tabs opening for TabGroup woul dbe that of Applet Configuration
Now, To open a customised TabGroup, We need to map the "class" attribute of the
launchConfigurationTabGroup in the
extensions tab to your customised class.
The customised class for Configuration TabGroup should
1)
implement AbstractLaunchConfigurationTabGroup.
2)overide Launch() to include the list of default tabs or customised tabs that needs to make up your tab group.
Find below an example code snippet:
---------------------------------------------------------------------------------
package z_launchconfig.TabImplementation;
import org.eclipse.debug.ui.AbstractLaunchConfigurationTabGroup;
import org.eclipse.debug.ui.CommonTab;
import org.eclipse.debug.ui.ILaunchConfigurationDialog;
import org.eclipse.debug.ui.ILaunchConfigurationTab;
/*import org.eclipse.jdt.debug.ui.launchConfigurations.AppletMainTab;import org.eclipse.jdt.debug.ui.launchConfigurations.AppletParametersTab;import org.eclipse.jdt.debug.ui.launchConfigurations.JavaArgumentsTab;import org.eclipse.jdt.debug.ui.launchConfigurations.JavaClasspathTab;import org.eclipse.jdt.debug.ui.launchConfigurations.JavaJRETab;*/
public class MyJavaAppletTabGroupClass extends AbstractLaunchConfigurationTabGroup
{
/** * Constructs a new Java applet tab group. */
public MyJavaAppletTabGroupClass()
{
}
/* (non-Javadoc) * @see org.eclipse.debug.ui.ILaunchConfigurationTabGroup#createTabs(org.eclipse.debug.ui.ILaunchConfigurationDialog, java.lang.String) */
public void createTabs(ILaunchConfigurationDialog dialog, String mode)
{
ILaunchConfigurationTab[] tabs = new ILaunchConfigurationTab[] { new CommonTab() };
setTabs(tabs);
}
}
--------------------------------------------------------------------------
In the code above, the line
new CommonTab()
adds the 'common' tab into the Configuration group. And therefore our customised ConfigurationTabGroup would consis of only one Tab as in figure below:
 Now, if the line new CommonTab(),
is replaced with many more default tabs as in the code below..
------------------------------------
new CommonTab(),
new AppletMainTab(),
new AppletParametersTab(),
new JavaArgumentsTab(),
new JavaJRETab(),
new JavaClasspathTab(),
------------------------------------
The tabGroup will have more tabs as in figure below.

Now, for a quick summary of the above steps:
1) Create a simple plu-in project, maybe with a pop-upMenu
2) Open the Plugin.xml file of this project and include the following snippet in it.
 This would like like the figure below in your extensions tab :

3) Now, the class attribute of the (
launchConfigurationTabGroup) extension needs to be implemented as below
(you could also refer above for the code) :
 4)
Important note : The import statement of this source is not available in the default library of the project. Hence we need to add them.
And hence,
Add,
1)org.eclipse.debug.ui
and all other related plug-in in the dependencies tab of Plugin.xml
The above 4 steps ensures the implementation of customised Run and debug Configurations in your project.
4)
Important note : The import statement of this source is not available in the default library of the project. Hence we need to add them.
And hence,
Add,
1)org.eclipse.debug.ui
and all other related plug-in in the dependencies tab of Plugin.xml
The above 4 steps ensures the implementation of customised Run and debug Configurations in your project.
*****************************************************